Data validation in Excel helps you control the type of data entered into a cell, ensuring accuracy and consistency. It acts as a safeguard against errors, which could otherwise compromise the integrity of your spreadsheets. By applying validation rules, you can prevent mistakes, maintain uniformity, and save time on corrections. For example, customized rules reduce discrepancies, streamline workflows, and enhance productivity. Tools like FineReport take this further by integrating data validation with advanced reporting capabilities, giving you a seamless way to manage and analyze data effectively.

Data validation in Excel refers to the process of ensuring that the data entered into a cell meets specific criteria or rules. This feature helps you control the type, range, or format of data that can be input into your spreadsheet. For example, you can restrict a cell to accept only whole numbers between 1 and 15 or ensure that text entries do not exceed a certain length.
| Aspect | Description |
|---|---|
| Definition | Data validation is the process of ensuring that data values fall within a predetermined range. |
| Purpose | To ensure quality information is used in decision making and to identify common data entry errors. |
| Implementation Techniques | Various methods in Excel to enforce data entry rules and specifications. |
| Example | Ensuring that sales transaction values are whole numbers within a specific range (e.g., 1 to 15). |
| Importance | Helps in ongoing process improvement and checks business performance against standards or competitors. |
By using data validation in Excel, you can create a structured environment where only valid data is allowed, reducing the risk of errors and improving the overall quality of your spreadsheets.
Data validation plays a critical role in maintaining data accuracy. When you apply validation rules, you ensure that only appropriate and meaningful data is entered into your Excel sheets. This reduces the likelihood of errors, such as entering text where numbers are required or inputting dates outside a specified range.
| Component | Description |
|---|---|
| Settings | Controls and restricts the data in specific rows or columns. |
| Input Message | Provides a default or custom message at the data entry stage to guide users. |
| Error Alert | Notifies users when incorrect data is entered, preventing wrong data from being saved. |
For example, organizations often use data validation to ensure compliance with business standards. A university that implemented data validation services reported improved data quality and fewer errors in their Excel workflows. This demonstrates how validation not only enhances accuracy but also supports better decision-making.
Incorporating data validation into your Excel workflows offers several advantages:
For instance, data validation checks ensure that all collected data is accurate and complete, which is essential for effective analysis. This feature becomes even more valuable when managing large datasets or collaborating with multiple users. By implementing data validation in Excel, you create a reliable foundation for your workflows, enabling smoother operations and better outcomes.
To begin using data validation in Excel, you need to access the data validation dialog box. Follow these steps:
This tool is your gateway to creating rules that control what data can be entered into your spreadsheet. By starting here, you ensure that your data remains consistent and error-free.
Once the data validation dialog box is open, you can define the criteria for your rule:
For instance, if you want to restrict a cell to accept only numbers between 1 and 100, you would select "Whole Number" and enter 1 as the minimum and 100 as the maximum. This ensures that only valid data is entered, reducing the risk of errors.
Input messages and error alerts enhance the user experience by providing guidance and feedback:
To set these up, go to the Input Message and Error Alert tabs in the data validation dialog box. Adding these features ensures users understand the rules and helps maintain data accuracy.
One common data validation rule involves limiting the length of text entries. For example, you might want to ensure that a username is no longer than 10 characters. To do this:
This rule prevents users from entering overly long text, ensuring consistency across your dataset.
Another useful rule is restricting numbers to a specific range. For instance, if you're tracking sales figures, you might want to allow only numbers between 0 and 1,000. Here's how:
These simple rules improve data accuracy and make your spreadsheets more reliable.
To get the most out of data validation in Excel, keep these practical tips for effective data validation in mind:
By following these tips, you can create a robust system that minimizes errors and enhances data quality.
Setting minimum and maximum values is one of the most common data validation rules in Excel. This rule ensures that only numbers within a specific range are allowed in a cell. For example, if you’re tracking employee work hours, you can restrict entries to a range between 0 and 24. To set this up:
This rule prevents outliers and ensures that your data remains consistent and meaningful.
When working with numerical data, you may need to decide whether to allow whole numbers, decimals, or both. For instance, whole numbers are ideal for counting items, while decimals are better suited for measurements like weight or percentages. You can specify this in the data validation dialog box by selecting either "Whole Number" or "Decimal" under the Allow dropdown.
By tailoring the rule to your dataset, you can maintain accuracy and ensure that the data aligns with your requirements.
Rules of date validation in Excel help you control the range of dates that users can enter. For example, you might want to ensure that project deadlines fall within a specific timeframe, such as January 1, 2023, to December 31, 2023. To apply this rule:
This rule is particularly useful for scheduling tasks or managing timelines. Research confirms that such rules prevent outliers and maintain data integrity, as shown below:
| Evidence Description | Impact |
|---|---|
| Data validation rules for date ranges ensure that only valid dates are entered. | This prevents outliers and maintains data integrity, which is crucial for accurate scheduling and temporal analysis. |
You can also use date validation in Excel to restrict entries to either future or past dates. For example, if you’re tracking upcoming events, you can set the start date as today’s date and leave the end date open. This ensures that only future dates are entered. Similarly, for historical data, you can restrict entries to past dates.
These rules help you maintain relevance and accuracy in your datasets, especially when dealing with time-sensitive information.
A data validation list allows you to create dropdown menus in Excel, making data entry faster and more accurate. To create one:
For example, you can create a dropdown for product categories like "Electronics," "Clothing," and "Home Goods." This ensures that users select only predefined options, reducing errors and improving consistency.
Dynamic lists take dropdown menus a step further by updating automatically when new items are added. To create a dynamic list, you can use Excel’s Table feature or define a named range. This is particularly useful for datasets that grow over time, such as inventory lists or employee directories.
Case studies highlight the effectiveness of dropdowns across various industries:
| Industry | Application Description |
|---|---|
| Inventory Management | Retail company used dropdowns for product names, SKU numbers, and prices, reducing human error in data entry. |
| Financial Budgeting | Financial department categorized expenses using dropdowns, enhancing clarity in financial reports. |
| Human Resources | HR department tracked employee information with dropdowns, ensuring consistency in records. |
| Customer Relationship Management | Sales team used dropdowns to classify leads and feedback, standardizing data recording for better analysis. |
| Project Management | Project managers assigned tasks using dropdowns for status updates, improving transparency. |
| Educational Administration | Schools used dropdowns for grades and attendance, providing a uniform data entry approach. |
| Healthcare Scheduling | Healthcare settings utilized dropdowns for scheduling appointments, improving booking efficiency. |
By incorporating dropdowns and dynamic lists, you can streamline workflows and enhance data accuracy across various applications.
Custom formulas in Excel allow you to create advanced data validation rules tailored to your specific needs. These formulas give you the flexibility to enforce unique conditions that standard validation options cannot handle. For example, you can use a formula to ensure that a cell contains a value greater than the sum of two other cells or to validate entries based on multiple criteria.
To write a custom formula for validation, follow these steps:
For instance, if you want to ensure that a cell contains a value greater than 10, you would enter the formula =A1>10. Excel will then validate the data based on this condition. Custom formulas provide a powerful way to implement advanced data validation techniques, ensuring your data meets complex requirements.
However, writing custom formulas requires precision. Errors in logic or syntax can lead to incorrect validation, allowing invalid data to slip through. Common issues include mismatched data types, incorrect references, and formula errors like #DIV/0! or #VALUE!. These mistakes can disrupt data accuracy and compromise the integrity of your spreadsheet.
| Error Type | Description | Impact on Data Accuracy |
|---|---|---|
| Formula Logic | Issues with the logic of the formula can lead to incorrect validation. | Allows invalid entries, undermining data integrity. |
| Data Types | Mismatched data types can cause validation to fail. | Results in invalid data being accepted. |
| Handling Existing Data | Poor handling of existing data can lead to validation errors. | Fails to enforce validation rules, allowing inaccuracies. |
| #DIV/0! Error | Occurs when a formula attempts to divide by zero. | Disrupts calculations and data analysis. |
| #VALUE! Error | Arises from incompatible data types in formulas. | Makes it difficult to pinpoint data entry inconsistencies. |
| #REF! Error | Results from deleted cells or ranges referenced in formulas. | Affects multiple calculations in complex spreadsheets. |
| #NAME? Error | Occurs due to unrecognized text in a formula. | Can lead to incorrect results if functions are misspelled. |
To avoid these pitfalls, test your formulas thoroughly before applying them. This ensures they work as intended and maintain the accuracy of your data.
Custom formulas enable you to implement sophisticated validation rules that go beyond basic settings. Here are some advanced examples to inspire you:
=COUNTIF(A:A, A1)=1. This rule prevents duplicate entries, which is particularly useful for datasets like employee IDs or product codes.=AND(A1="Yes", B1>0). This ensures that if cell A1 contains "Yes," cell B1 must have a value greater than 0.=WEEKDAY(A1, 2)<6. This rule prevents users from entering weekend dates, which is helpful for scheduling tasks or managing work hours.=AND(A1>0, A1<=100, MOD(A1,2)=0) ensures that a number is between 1 and 100 and is even.Custom formulas give you the ability to enforce complex rules, making your spreadsheets more robust and reliable. By mastering these techniques, you can handle intricate validation scenarios with ease.
Tip: Always document your custom formulas. This helps others understand the rules you've applied and makes it easier to troubleshoot issues.
When setting up data validation, simplicity is key. Overcomplicated rules can confuse users and make your spreadsheet harder to manage. For example, combining multiple conditions into one rule might seem efficient, but it often leads to errors or unintended restrictions. Instead, focus on creating straightforward rules that address specific needs.
You should avoid layering too many rules on a single cell. If you need complex validation, break it into smaller steps. For instance, use separate rules for text length and numeric ranges rather than combining them into one formula. This approach makes troubleshooting easier and ensures users understand the requirements.
Tip: Test each rule individually before applying it to your spreadsheet. This helps you identify potential issues early and ensures the rules work as intended.
Testing your data validation settings is essential. Many users skip this step, assuming their rules will work perfectly. However, even minor errors in the setup can lead to invalid data entries slipping through.
After defining your rules in the data validation dialog box, try entering different types of data to see how the system responds. For example, if you set a rule to restrict numbers between 1 and 100, test it by entering values outside this range. This ensures the validation works correctly and prevents future mistakes.
Note: Testing also helps you refine your input messages and error alerts. Clear and accurate messages guide users and reduce confusion during data entry.
Error alerts play a crucial role in maintaining data accuracy. These alerts notify users when they enter invalid data, preventing mistakes from being saved. Ignoring or disabling error alerts can compromise the integrity of your spreadsheet.
Customize your error alerts to provide helpful feedback. For instance, instead of a generic message like "Invalid entry," use specific instructions such as "Please enter a number between 1 and 100." This makes it easier for users to correct their mistakes.
Emoji Reminder: 🚨 Always enable error alerts for critical fields. They act as your first line of defense against incorrect data.
By paying attention to error alerts, you create a more user-friendly experience and ensure your data validation settings work effectively.
Custom formulas in Excel data validation offer flexibility, but improper use can lead to significant issues. Many users overlook critical aspects when creating these formulas, which compromises the effectiveness of their data validation settings. Here are some common pitfalls to avoid:
Another frequent issue arises when users bypass validation rules. For example, copying and pasting data into validated cells can override the rules. Similarly, external scripts or macros can circumvent these restrictions, introducing errors into your spreadsheet. To prevent this, you should regularly audit and update your validation rules. This ensures they remain effective and aligned with your data requirements.
When using custom formulas, precision is essential. A small error in logic or syntax can render the formula ineffective. For instance, a misplaced parenthesis or incorrect cell reference can allow invalid data to slip through. Always test your formulas thoroughly before applying them. This step ensures they function as intended and maintain the integrity of your data.
Tip: Document your custom formulas clearly. This helps you and your team understand the rules and makes troubleshooting easier.
Even with careful setup, data validation issues can occur. Knowing how to troubleshoot these problems ensures your validation rules work as expected. Below are common issues and their solutions:
| Issue Type | Troubleshooting Method | Example |
|---|---|---|
| Input Message and Error Alert Problems | Check Data Validation settings and ensure options are checked. | Specify input message for percentages: 'Enter a percentage as a decimal (e.g., 0.5 for 50%)'. |
| Invalid Data Not Being Rejected | Verify that validation criteria match requirements and check cell format. | Ensure date cells are formatted correctly to avoid accepting non-date entries. |
| Copying and Pasting Data | Use 'Paste Special' -> 'Values' to maintain validation rules. | Use 'Circle Invalid Data' to find entries that violate validation rules after pasting. |
| Performance Issues | Optimize formulas and limit the scope of validation. | Apply validation only to necessary cells instead of entire columns. |
For example, if your error alert fails to display, check whether the "Show error alert after invalid data is entered" option is enabled in the data validation settings. Similarly, if invalid data is being accepted, review the cell format to ensure it aligns with your validation criteria. For instance, date validation rules won’t work if the cell is formatted as text.
When dealing with performance issues, avoid applying validation rules to entire columns. Instead, restrict them to the necessary range of cells. This reduces processing time and ensures smoother operation.
Note: Use the "Circle Invalid Data" feature to quickly identify and correct entries that violate your validation rules. This tool highlights problematic cells, making it easier to address errors.
By understanding these troubleshooting methods, you can resolve common issues and maintain the accuracy of your data validation rules.
Data validation in Excel offers powerful tools for controlling data entry, but it has limitations that can affect your workflows. Understanding these drawbacks helps you decide when Excel is the right tool and when you might need alternatives.
Excel lacks advanced security measures, which makes your data vulnerable. If you share spreadsheets with others, unauthorized users can bypass validation rules by copying and pasting data or using external scripts. This compromises the integrity of your data. For sensitive information, Excel’s security features may not be sufficient to prevent manipulation or unauthorized access.
Tip: Consider using software with robust security options, like FineReport, for handling critical business data.
Excel struggles with integrating data from multiple sources. If you work with large datasets or need real-time updates, Excel’s manual processes can lead to inefficiencies. Spreadsheets often create data silos, where information remains isolated and difficult to combine with other systems. This limits your ability to perform comprehensive analysis or generate insights across platforms.
Errors in Excel spreadsheets are common. Studies show that up to 90% of spreadsheets contain mistakes, ranging from incorrect formulas to invalid data entries. These errors can undermine decision-making and lead to costly consequences. Even with data validation, human error during setup or maintenance can introduce inaccuracies.
Excel works well for small datasets but struggles with scalability. As your data grows, managing validation rules becomes increasingly complex. Large spreadsheets slow down performance and make troubleshooting difficult. If your organization handles extensive data, relying solely on Excel may hinder efficiency.
| Drawback | Impact |
|---|---|
| Limited Security Features | Data vulnerability and risk of unauthorized access. |
| Integration Challenges | Difficulty combining data from multiple sources, leading to inefficiencies. |
| Error-Prone Nature | High likelihood of mistakes affecting data integrity and decision-making. |
| Scalability Issues | Reduced performance and complexity in managing large datasets. |
Excel’s data validation is a useful tool, but it has limitations that can affect your workflows. For advanced needs, consider integrating tools like FineReport, which offer enhanced security, scalability, and integration capabilities. By recognizing these drawbacks, you can make informed decisions about your data management strategies.
FineReport complements data validation in Excel by offering advanced reporting and visualization capabilities. While Excel ensures accurate data entry, FineReport transforms this data into meaningful insights. You can use FineReport to create dynamic dashboards and pixel-perfect reports that integrate validated data seamlessly. For example, FineReport allows you to connect multiple data sources, ensuring that validated data from Excel is combined with other datasets for comprehensive analysis.

FineReport also supports real-time data entry and validation, making it ideal for scenarios where accuracy is critical. Its intuitive drag-and-drop interface simplifies report creation, while its robust permission management ensures that only authorized users can access sensitive data. By integrating FineReport with Excel, you can enhance your workflows and improve decision-making.


Pivot tables in Excel are powerful tools for summarizing and analyzing data. When combined with data validation, they become even more effective. You can use data validation rules to ensure that only relevant and accurate data is included in your pivot tables. For instance, applying a data validation list to filter entries ensures that your pivot table reflects consistent and meaningful data.
To set this up, first apply validation rules to your dataset. Then, create a pivot table to summarize the validated data. This approach reduces errors and enhances the reliability of your analysis. For example, if you’re tracking sales data, you can use validation to restrict entries to specific product categories. Your pivot table will then provide accurate summaries based on these categories, enabling better insights into sales performance.
Data filters in Excel allow you to focus on specific subsets of your data. When combined with data validation, they streamline workflows and improve efficiency. You can use filters to display only entries that meet your validation criteria, making it easier to analyze and manage large datasets.
Here’s how this combination boosts efficiency:
For example, if you’re managing inventory data, you can use validation to restrict entries to predefined product codes. Filters then allow you to view only specific categories, such as electronics or clothing. This combination reduces manual effort and ensures that your data remains accurate and organized.
Linking Excel data validation to external data sources can significantly enhance your data management capabilities. This approach allows you to pull data from reliable sources, ensuring consistency and accuracy across your spreadsheets. For example, you can connect Excel to databases like SQL Server or platforms like Salesforce to validate entries against predefined datasets.
When managing large datasets, this method becomes invaluable. It ensures that data entered into Excel aligns with the master records stored in external systems. Here’s how this works in practice:
To implement this, you can use Excel’s Get & Transform feature (formerly Power Query). This tool allows you to import data from external sources and use it as a reference for validation. For instance, if you manage an inventory, you can link Excel to your database and validate product codes against the master list. This reduces errors and ensures that only valid entries are accepted.
Tip: Always ensure that your external data source is up-to-date. Outdated references can lead to incorrect validations, compromising the accuracy of your data.
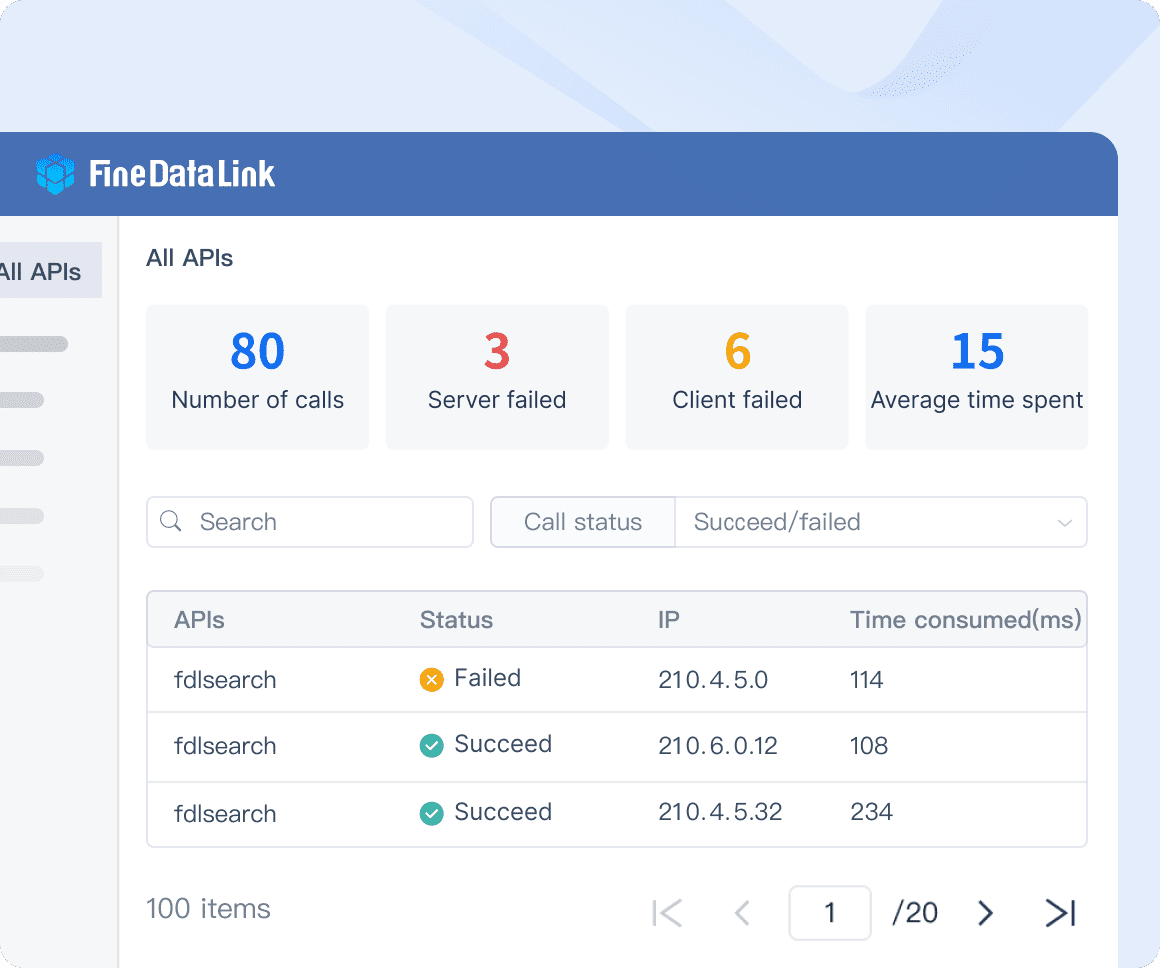
FanRuan’s FineDataLink takes data validation to the next level by offering seamless integration with multiple data sources. This platform enables you to synchronize data in real-time, ensuring that your Excel sheets always reflect the latest information. FineDataLink supports over 100 common data sources, making it a versatile tool for businesses dealing with diverse datasets.

With FineDataLink, you can automate data validation processes, eliminating the need for manual updates. For example, you can set up real-time synchronization between your Excel sheet and a cloud database. This ensures that any changes in the database are instantly reflected in your spreadsheet, maintaining data accuracy.
Here are some key benefits of using FineDataLink:
By integrating FineDataLink with Excel, you can streamline workflows and reduce the risk of errors. This combination is particularly useful for organizations that handle large volumes of data from multiple sources. It not only improves efficiency but also enhances decision-making by providing accurate and up-to-date information.

Emoji Reminder: 🚀 FineDataLink empowers you to elevate your data validation processes, making your workflows faster and more reliable.
Data validation in Excel is essential for maintaining data integrity and ensuring accurate workflows. By applying validation rules, you can prevent errors, improve data quality, and streamline operations. Techniques like dropdown lists, custom formulas, and error alerts make this process effective and user-friendly.
To stay ahead, consider future trends like federated learning for privacy, edge computing for real-time validation, and AutoML platforms for simplified techniques. Tools like FineReport further enhance your capabilities by integrating advanced reporting and visualization features. These innovations empower you to manage data more efficiently and make informed decisions.
Click the banner below to try FineReport for free and empower your enterprise to transform data into productivity!

The Author
Lewis
Senior Data Analyst at FanRuan
Related Articles

Mastering Advanced Excel Data Visualization Techniques
Master advanced Excel data visualization techniques to transform complex datasets into compelling visual stories and enhance your data analysis skills.
Lewis
Nov 25, 2024

Step-by-Step Guide to Excel Data Validation Techniques
Master Excel data validation with step-by-step techniques to enhance data accuracy and prevent errors. Learn basic and advanced methods for optimal results.
Howard
Aug 18, 2024

2025's Best Data Validation Tools: Top 7 Picks
Explore the top 7 data validation tools of 2025, featuring key features, benefits, user experiences, and pricing to ensure accurate and reliable data.
Howard
Aug 15, 2025


